
Svelte 做個簡單的 TodoList
tags: Svelte
category: Front-End
description: Svelte 做個簡單的 TodoList
created_at: 2023/04/05 00:00:00

前言
老樣子最後來做一個簡單的 TodoList,因為前面已經講了滿多基本的功能,是時候把那些功能組合起來了,成品跟當初 Vue 3 文章 的版本一樣,因為這樣也能夠比較同樣的 APP,但使用不同的方式去寫。
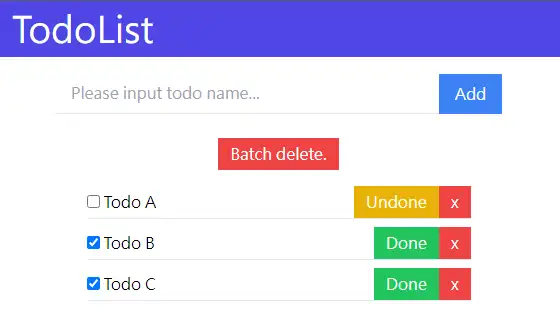
老樣子附上成品的長相
事前準備
先照著第一篇 Svelte 開新專案與環境設定 去建好開發環境(包含 ESLint、Prettier、TailwindCSS)
接下來會照著當初 Vue 3 文章 的步驟一樣進行
開始
先簡單建立一個 header 來用
src/components/Header.svelte
<header class="bg-indigo-600 text-white px-4 py-2 mb-4">
    <h1 class="text-4xl">TodoList</h1>
</header>
再來做一個簡單的表單放在畫面中間
這時候的 src/routes/+page.svelte
<script lang="ts">
    import '../index.css';
    import Header from '../components/Header.svelte';

    let name = '';

    const addTodo = () => {
        if (!name) {
            return;
        }

        console.log(name);
        name = '';
    };
</script>

<Header />

<main class="flex flex-col items-center">
    <form on:submit|preventDefault={addTodo}>
        <div class="flex items-center justify-center">
            <input
                id="todo-input"
                class="border-b outline-none w-96 px-4 py-2"
                type="text"
                placeholder="Please input todo name..."
                bind:value={name}
            />
            <button class="bg-blue-500 text-white px-4 py-2">Add</button>
        </div>
    </form>
</main>
會看到每次輸入完後送出表單都會在 console.log 印出輸入的值。
再來需要建立一個存代辦事項的陣列。
假設要額外建立一個 model,存單一 todo 的資料結構
注意: 這裡與 Vue 3 那篇中不太一樣,多了一個 id 欄位(自動遞增)
src/models/Todo.ts
let id = 0;
class Todo {
    id: number;
    name: string;
    done: boolean;

    constructor(name: string, done = false) {
        this.id = ++id;
        this.name = name;
        this.done = done;
    }
}

export default Todo;
那麼現在的 +page.svelte 的 ts 部分會變成這樣
    import '../index.css';
    import Header from '../components/Header.svelte';
    import Todo from '../models/Todo';

    let name = '';
    let todos: Todo[] = [];

    const addTodo = () => {
        if (!name) {
            return;
        }

        const todo = new Todo(name);
        todos = [...todos, todo];
        name = '';
    };

    $: console.log(todos);
每當輸入完後送出一次表單,就會往 todos 裡面塞一個新的代辦事項
需要注意的是特別用 todos = [...todos, todo] 這樣寫,是為了誘導出 Svelte 編譯出 $$invalidate,如果忘記的話可以回去看 Svelte響應式資料
而 $: console.log(todos); 只是為了讓你方便看,之後可以拿掉。
再來需要一個 TodoList 元件去顯示這些代辦事項
src/components/TodoList.svelte
<script lang="ts">
    import type Todo from '../models/Todo';

    export let todos: Todo[];
</script>

<div class="w-96 py-2">
    <div class="text-center my-4">
        <button class="bg-red-500 text-white px-3 py-1">Batch delete.</button>
    </div>
    <ul>
        {#each todos as todo (todo.id)}
            <li class="flex justify-between border-b mb-2">
                <label class="flex-grow py-1">
                    <input type="checkbox" />
                    {todo.name}
                </label>

                <div class="flex">
                    {#if todo.done}
                        <button class="bg-yellow-500 text-white px-3 py-1"> Undone </button>
                    {:else}
                        <button class="bg-green-500 text-white px-3 py-1"> Done </button>
                    {/if}

                    <button class="bg-red-500 text-white px-3 py-1"> x </button>
                </div>
            </li>
        {/each}
    </ul>
</div>
再來先嘗試對 checkbox 做雙向綁定,去抓出選取的代辦事項的索引值。
<script lang="ts">
    // ...
    let selectedIndexes: number[] = [];
    // ...
</script>

<!-- 略... -->
{#each todos as todo, index (todo.id)}
    <li class="flex justify-between border-b mb-2">
        <label class="flex-grow py-1">
            <input type="checkbox" bind:group={selectedIndexes} value={index} />
            {todo.name}
        </label>
<!-- ...略 -->
記得要把 #each 的索引值拿出來,還有設定一下 input 的 value
抓出索引之後,就可以開始做切換代辦事項的狀態(done/undone)或是刪除了。
先在 +page.svelte 寫入函數定義
<script lang="ts">
    // 略...
    const deleteByIndexes = (e: CustomEvent<number[]>) => {
        todos = todos.filter((_, index) => !e.detail.includes(index));
    };

    const switchStatusByIndex = (e: CustomEvent<number>) => {
        todos[e.detail].done = !todos[e.detail].done;
    };
</script>

<main>
    <!-- 略... -->
    <TodoList
        {todos}
        on:deleteByIndexes={deleteByIndexes}
        on:switchStatusByIndex={switchStatusByIndex}
    />
    <!-- ...略 -->
</main>
從上層傳入兩個事件,讓子元件有能力可以對代辦事項做操作。
而子元件的部分主要多了這幾段
<script lang="ts">
    import { createEventDispatcher } from 'svelte';
    import type Todo from '../models/Todo';

    const dispatch = createEventDispatcher();

    let selectedIndexes: number[] = [];
    const batchDelete = () => {
        dispatch('deleteByIndexes', selectedIndexes);
        selectedIndexes = [];
    };

    const deleteByIndex = (index: number) => {
        const idx = selectedIndexes.indexOf(index);
        if (idx !== -1) {
            selectedIndexes.splice(idx, 1);
        }
        selectedIndexes = selectedIndexes.map((idx) => (idx > index ? idx - 1 : idx));

        dispatch('deleteByIndexes', [index]);
    };

    export let todos: Todo[];
</script>

<div class="w-96 py-2">
  <!-- 略... -->
      <button class="bg-red-500 text-white px-3 py-1" on:click={batchDelete}>Batch delete.</button>
  <!-- 略... -->
        <div class="flex">
            {#if todo.done}
                <button
                    class="bg-yellow-500 text-white px-3 py-1"
                    on:click={() => dispatch('switchStatusByIndex', index)}
                >
                    Undone
                </button>
            {:else}
                <button
                    class="bg-green-500 text-white px-3 py-1"
                    on:click={() => dispatch('switchStatusByIndex', index)}
                >
                    Done
                </button>
            {/if}

            <button class="bg-red-500 text-white px-3 py-1" on:click={() => deleteByIndex(index)}>
                x
            </button>
        </div>
  <!-- 略... -->
</div>
會看到中間那一段 #if、:else,大多地方是重複的,所以可以再換個寫法,就看個人喜歡
<button
    class="text-white px-3 py-1"
    class:bg-yellow-500={todo.done}
    class:bg-green-500={!todo.done}
    on:click={() => dispatch('switchStatusByIndex', index)}
>
    {todo.done ? 'Undone' : 'Done'}
</button>這裡有個前面沒提到的用法,class:bg-yellow-500={todo.done} 代表的意思是當 todo.done 是 true 的時候,會設定 bg-yellow-500 這個 class
基本上到這邊簡單的 TodoList 就完成了。
至於各函數的說明
deleteByIndexesswitchStatusByIndexbatchDeletedeleteByIndex
因為與 Vue 3 文章的邏輯相同,就不再重複一次了。
最後
這篇文章的成品一樣有在 Github
最後也附上DEMO